Category Archives: testing

Forcing iOS and Android Data to Burp on a Mac

When pen testing web interfaces and REST APIs for mobile apps, intercepting the messages in Burp can be difficult, especially for those apps that do not respect the http proxy settings. The following guide will help you proxy all the information from your mobile device to a Mac and route specific messages of interest to Burp. We will setup a Mac to act as a proxy and route all of the mobile device’s data.
This guide assumes a few things:
1) Both of the devices need to be on the same network/subnet.
2) You have Burp and know how to use it.
3) You are familiar with basic routing; working with network settings on you mobile device and OSX command line.
4) The Mac device is running Sierra and Burp is version 1.7.22 (or there about)

On the Mac running Sierra, we will need to do a few things:
With Burp:
1. Start Burp
2. Goto Proxy -> Intercept, turn “Intercept is on” to “Intercept is off”
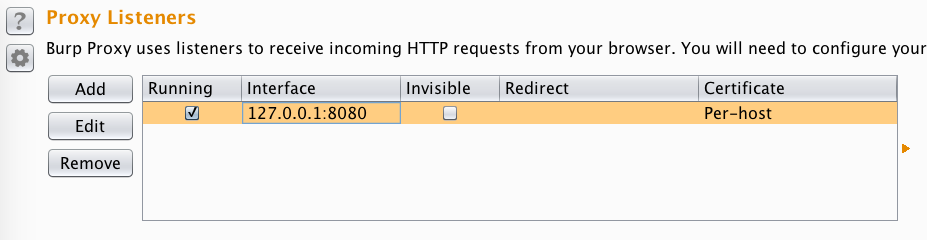
3. Goto Proxy -> Options and select the 127.0.0.1:8080 Proxy Listener and “Edit” it.

4. In the “Edit proxy listener” window, select the “Request handling” tab and enable “Support invisible proxying” and then select Ok.
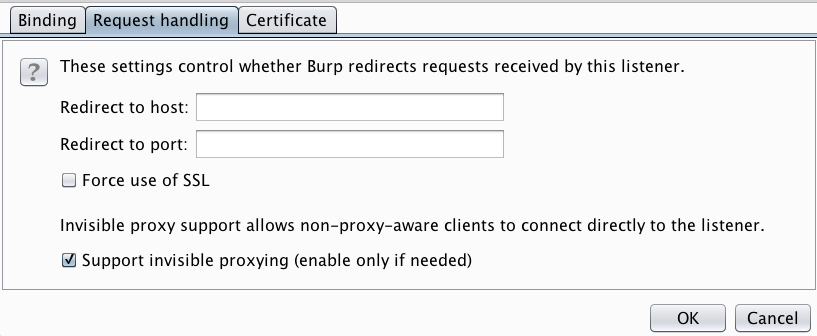
Note: You may also need to change the “Bind to address” under tab Binding to “All interfaces”.

5. While probably not necessary, I like to reset the Proxy Listener. Goto Proxy -> Options and uncheck and then check (selecting twice) the Running status for the 127.0.0.1:8080 Proxy Listener.

In OSX’s System preferences, under Security & Privacy, turn off the firewall. We will be forwarding all the data from the iOS device to the Mac and the firewall will prevent us from receiving. Do not forget to re-enable to firewall when you are done.

Next, we need to turn on forwarding. Once the Mac receives the data, it needs to forward it so information so it will be directed where it needs to go. Open Terminal and from the command line, run:
sudo sysctl -w net.inet.ip.forwarding=1

This command will prompt you for your password and tell the Mac to forward any data it receives to where it needs to go.

Now, we need to tell OSX to route specific messages to Burp. From the command line, run:

echo "rdr pass inet proto tcp from (Device IP Address) to any port 80 -> 127.0.0.1 port 8080" | sudo pfctl -ef -

This command will route messages from your mobile device using port 80 to Burp. Remove the ‘(Device IP Address)’ and put your mobile device’s IP address in its place. If you wish to route different ports (say 443 for https messages), then change 80 to the desired port. If you wish to route both 80 and 443, then change the 80 to 80:443.

Note: the ip forwarding and rdr settings will not persist after a reboot but the firewall will remain disabled.

Now, let’s setup the mobile device: For iOS (iPad, iPhone, etc)
Goto the wireless connection’s settings; in iOS, this is under Settings -> Wi-Fi and select the blue circled i. The device cannot use DHCP but you must configure all the settings manually. Select the “Static” tab and set the device’s IP address (the same as in the above rdr setting), subnet mask and DNS setting. For the Router (or Gateway on Android), set it to the IP address of the OSX Mac device running Burp. This will force the mobile device to send all of its data to the Mac.

On the iOS device, open a web browser and go to a web site that is on port 80; drudgereport.com should work. In Burp’s Proxy -> HTTP history, you should see the requests to the web site from the iOS device being captured.

Now that you are capturing the messages, you can utilize Burp’s capabilities for testing.

ShellShock Worm hitting QNAP NAS devices

Several months later and now a worm has been released hitting QNAP devices. It spreads by connecting to QNAP devices open to the internet (yeh, brilliant thing to do) that have not been patched. (just as brilliant) 🙂

How can I tell if my device is infect?
Look in /etc/shadow and /etc/passwd for an account named “request” If you find it, your infected.

I am infected! Help!
To delouse your system, go to QNap’s page.

How can I tell if my device is vulnerable to ShellShock?
SSH into your device and run the following command: (use at your own risk)
curl https://shellshocker.net/shellshock_test.sh | bash
More information can be found at ShellShocker.net.

How do I patch my device if it is vulnerable?
If your already infected, the worm nicely patches your system. How considerate. 🙂
Else, go to QNap’s page for instructions on how to update your device.

Test Your Server for the Poodle Vulnerablity

The latest crypto issue to hit is the “Poodle” attack. A good explanation of poodle can be found at the openssl website.

The simplest way to test your server is an online scanner at .
Putting google.com results in the following report:
Scan results
google.com:443 (74.125.225.104) - Vulnerable

This server supports the SSL v3 protocol.

But how does one test a server that is not online or exposed to the world? OWASP’s website has some great information on how to extract a servers SSL/TLS information.
I ran a slightly modified version of the test (without the cert information dump) against google.com. Its a bit verbose but lets see the output:
nmap --script ssl-enum-ciphers -p 443 google.com

Starting Nmap 6.40 ( http://nmap.org ) at 2014-10-28 15:20 EDT
Nmap scan report for google.com (74.125.226.162)
Host is up (0.037s latency).
Other addresses for google.com (not scanned): 74.125.226.160 74.125.226.168 74.125.226.161 74.125.226.169 74.125.226.164 74.125.226.166 74.125.226.167 74.125.226.165 74.125.226.163 74.125.226.174
rDNS record for 74.125.226.162: lga15s45-in-f2.1e100.net
PORT STATE SERVICE
443/tcp open https
| ssl-enum-ciphers:
|  SSLv3:
|  ciphers:
|   TLS_ECDHE_RSA_WITH_3DES_EDE_CBC_SHA - strong
|   TLS_ECDHE_RSA_WITH_AES_128_CBC_SHA - strong
|   TLS_ECDHE_RSA_WITH_AES_256_CBC_SHA - strong
|   TLS_ECDHE_RSA_WITH_RC4_128_SHA - strong
|   TLS_RSA_WITH_3DES_EDE_CBC_SHA - strong
|   TLS_RSA_WITH_AES_128_CBC_SHA - strong
|   TLS_RSA_WITH_AES_256_CBC_SHA - strong
|   TLS_RSA_WITH_RC4_128_MD5 - strong
|   TLS_RSA_WITH_RC4_128_SHA - strong
|  compressors:
|  NULL
|  TLSv1.0:
|  ciphers:
|   TLS_ECDHE_RSA_WITH_3DES_EDE_CBC_SHA - strong
|   TLS_ECDHE_RSA_WITH_AES_128_CBC_SHA - strong
|   TLS_ECDHE_RSA_WITH_AES_256_CBC_SHA - strong
|   TLS_ECDHE_RSA_WITH_RC4_128_SHA - strong
|   TLS_RSA_WITH_3DES_EDE_CBC_SHA - strong
|   TLS_RSA_WITH_AES_128_CBC_SHA - strong
|   TLS_RSA_WITH_AES_256_CBC_SHA - strong
|   TLS_RSA_WITH_RC4_128_MD5 - strong
|   TLS_RSA_WITH_RC4_128_SHA - strong
|  compressors:
|  NULL
|  TLSv1.1:
|  ciphers:
|   TLS_ECDHE_RSA_WITH_3DES_EDE_CBC_SHA - strong
|   TLS_ECDHE_RSA_WITH_AES_128_CBC_SHA - strong
|   TLS_ECDHE_RSA_WITH_AES_256_CBC_SHA - strong
|   TLS_ECDHE_RSA_WITH_RC4_128_SHA - strong
|   TLS_RSA_WITH_3DES_EDE_CBC_SHA - strong
|   TLS_RSA_WITH_AES_128_CBC_SHA - strong
|   TLS_RSA_WITH_AES_256_CBC_SHA - strong
|   TLS_RSA_WITH_RC4_128_MD5 - strong
|   TLS_RSA_WITH_RC4_128_SHA - strong
|  compressors:
|  NULL
|  TLSv1.2:
|  ciphers:
|   TLS_ECDHE_RSA_WITH_3DES_EDE_CBC_SHA - strong
|   TLS_ECDHE_RSA_WITH_AES_128_CBC_SHA - strong
|   TLS_ECDHE_RSA_WITH_AES_128_CBC_SHA256 - strong
|   TLS_ECDHE_RSA_WITH_AES_128_GCM_SHA256 - strong
|   TLS_ECDHE_RSA_WITH_AES_256_CBC_SHA - strong
|   TLS_ECDHE_RSA_WITH_AES_256_CBC_SHA384 - strong
|   TLS_ECDHE_RSA_WITH_AES_256_GCM_SHA384 - strong
|   TLS_ECDHE_RSA_WITH_RC4_128_SHA - strong
|   TLS_RSA_WITH_3DES_EDE_CBC_SHA - strong
|   TLS_RSA_WITH_AES_128_CBC_SHA - strong
|   TLS_RSA_WITH_AES_128_CBC_SHA256 - strong
|   TLS_RSA_WITH_AES_128_GCM_SHA256 - strong
|   TLS_RSA_WITH_AES_256_CBC_SHA - strong
|   TLS_RSA_WITH_AES_256_CBC_SHA256 - strong
|   TLS_RSA_WITH_AES_256_GCM_SHA384 - strong
|   TLS_RSA_WITH_RC4_128_MD5 - strong
|   TLS_RSA_WITH_RC4_128_SHA - strong
|  compressors:
|  NULL
|_  least strength: strong

Nmap done: 1 IP address (1 host up) scanned in 2.39 seconds
While its a very long list of supporting ciphers, the culprits are the ones highlighted in red – those that support the *_CBC_* block cipher in SSLv3. If you find any of those then your server supports the vulnerability.